Open Source Analytics In A Beautiful Dashboard? - Part 1
The Story
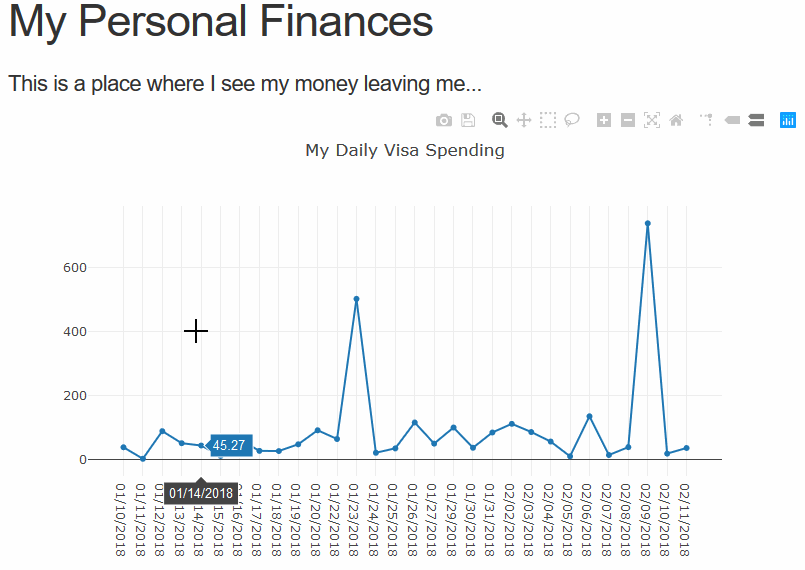
Working for large Canadian telecommunications company has introduced me to the complexities and costs of how Business Intelligence (BI) groups operate. Usually it’s along the lines of some MicroStrategy / Tableau solution with restricted / expensive licenses. Not great since their software scales with money, not skill (I guess a little bit of skill :S). I decided to take it on myself to change how things were done, and modernize the team with some more advanced tooling, mostly Python / Jupyter but that got the ball rolling. Soon after I discovered Dash by Plotly and it seemed like the perfect solution for providing some of our business analysts (BAs) the tools to refresh their dashboards. So we’ll go over how to create a simple dash app, namely one to give you some insights into your spending habits with database and all. I’ll be hand holding a bit, so feel free to skip ahead and check out the repo to do with it what you will.
The Marriage of Flask + React + Plotly.js
Dash is simple web framework with flask in the back, react in the front, and plotly.js for all the pretty pictures. The benefit is it’s all done in Python… well… you can’t really escape HTML or CSS but that’s beside the point. FYI I’m assuming you have Python 3+ and we’ll start from the Hello World example in plotly’s docs. First let’s install the packages we need.
pip install dash dash_core_components dash_html_components python-dotenv
The dotenv package is the lazy mans way to set environment variables when you come to the project. So I’ve also created a .env file with the one line
FLASK_ENV=development
Here’s the layout I like to use for dash apps:
|-- .env
|-- requirements.txt
|-- run.py
`-- webapp
    |-- __init__.py
    `-- templates
        `-- index.py
where webapp/templates holds my “HTML” code. Here’s what index.py looks like
import dash_core_components as dcc
import dash_html_components as html

def render():
    return html.Div(children=[
        html.H1(children='Hello Dash'),

        html.Div(children='''
            Dash: A web application framework for Python.
        '''),

        dcc.Graph(
            id='example-graph',
            figure={
                'data': [
                    {'x': [1, 2, 3], 'y': [4, 1, 2], 'type': 'bar', 'name': 'SF'},
                    {'x': [1, 2, 3], 'y': [2, 4, 5], 'type': 'bar', 'name': u'Montréal'},
                ],
                'layout': {
                    'title': 'Dash Data Visualization'
                }
            }
        )
    ])
It’s nice to wrap your html snippets in a function, so you can inject in whatever on generation. The rest of the server is just in the __init__.py file.
import dash

from .templates import index

external_stylesheets = ['https://codepen.io/chriddyp/pen/bWLwgP.css']

app = dash.Dash(__name__, external_stylesheets=external_stylesheets)

app.layout = index.render()
The last bit is run.py, which is the script I call to start the flask server for local dev work. You should use something like green unicorn for a more serious server.
from webapp import app

if __name__ == '__main__':
    app.run_server(debug=True)
You can now easily start the server with python run.py, and we’ve got a nice Hello World layout to start with. I’ve pulled some data from my credit card (in form of a .csv), we’ll load this into a postgres database soon, but let’s have a look at the structure my bank gives the data ( Your bank / credit provider may have a slightly different format, so take note!)
| Date | Vendor | Charge | Credit | Total Balance |
|---|---|---|---|---|
| 01/10/2018 | SKYWAY CIGAR | 9.73 | 68.07 | |
| 01/11/2018 | MCDONALD’S #40548 | 1.84 | 69.91 | |
| 01/11/2018 | MCDONALD’S #40548 | 2.05 | 71.96 | |
| 01/12/2018 | PLAYSTATION NETWORK | 66.58 | 162.04 | |
| 01/12/2018 | CROCODILE ROCK | 23.5 | 95.46 | |
| 01/13/2018 | LCBO/RAO #0511 | 36.9 | 198.94 | |
| 01/13/2018 | UBER TRIP HQQFO HELP.UBER | 15.49 | 214.43 | |
| 01/14/2018 | PIZZA PIZZA LTD | 34 | 259.7 | |
| 01/14/2018 | UBER TRIP MBMCU HELP.UBER | 11.27 | 225.7 | |
| 01/15/2018 | TIM HORTONS 2115 QTH | 5.9 | 265.6 | |
| 01/15/2018 | HERO CERTIFIED BURGERS | 6.76 | 272.36 | |
| 01/16/2018 | PRESTO | 20 | 297.56 |
I always like to get something up and running quickly, then iterate on top of that. Let’s focus on the Charge column and get us a nice time series of our charge history. My data happened to be unlabeled, so I have a file called consts.py with the labels I’d like to work with:
DATA_COLUMNS = ['Date','Vendor','Charge','Credit','Total Balance']
DATA_DATE = 'Date'
DATA_CHARGE = 'Charge'
Then I’ve created a folder called managers in webapp, and I’ll put in a simple object to input my data into and spit out the time series. In data.py we’ll create the DataManager:
import os
import pandas as pd

from ..consts import DATA_COLUMNS,DATA_DATE,DATA_CHARGE

class DataManager():

    def load_csv_data(self,filename):
        self.data = pd.read_csv(filename,names=DATA_COLUMNS)

    def load_test_data(self):
        self.load_csv_data(os.path.join(os.getcwd(),"webapp","test_data","Jan-2018.csv"))

    def get_charge_series_tuple(self):
        """
        Separates the date and charge values for easy plotting from the loaded data.

        returns (date_array,charge_array)
        """
        try:
            series = self.data.groupby([DATA_DATE]).sum()[DATA_CHARGE]
            return (series.index.values,series.values)
        except AttributeError:
            raise Exception('Data must be loaded into DataManager')
        except KeyError:
            raise Exception('Column names of your data do not match your keys')
Now that we have a simple way to interact with the data, let’s throw it into the plotly.js chart. As you probably noticed, I separate everything out since I prefer things small and reusable. So I’ve added another file to our managers folder, which I’ve called graph.py, which basically will contain our simple layer to plotly’s graph objects. Since all we need is a scatter plot, all we need is
import plotly.graph_objs as go

def createScatterTrace(x, y, mode='lines+markers', name='unnamed-trace'):
    return go.Scatter(
        x = x,
        y = y,
        mode = mode,
        name = name
    )
Now we just have to change out the trace in our rendered index page. I’ve modified some of the strings laying around in their and moved them to consts.py. Your index should look something like this
...
from ..managers.graph import createScatterTrace

from ..consts import WEBAPP_TITLE, WEBAPP_SUBTITLE, WEBAPP_GRAPH_TITLE

def render(x,y):
    return html.Div(children=[
        html.H1(children=WEBAPP_TITLE),

        html.H5(children=WEBAPP_SUBTITLE),

        dcc.Graph(
            id='example-graph',
            figure={
                'data': [
                    createScatterTrace(x,y)
                ],
                'layout': {
                    'title': WEBAPP_GRAPH_TITLE
                }
            }
        )
    ])
Notice that we’re passing the data as a parameter of render, which means we’ll need to initialize our data manager and pass the data into our layout before we can assign it to app.layout. The last change is now to our apps __init__.py file, we simply call on DataManager:
...
app = dash.Dash(__name__, external_stylesheets=external_stylesheets)

# load the data
dm = DataManager()
dm.load_test_data()
x,y = dm.get_charge_series_tuple()

app.layout = index.render(x,y)
Now we have a basic implementation of our data in a dashboard! The next part will deal with more data manipulation with callback’s so we can visualize the data better.